


First impressions matter, especially in online retail. A cluttered interface can deter visitors before they even explore your products. Effective online store design creates a seamless user experience and a visually appealing website. The WooCommerce cart icon is a common feature in most online stores. While generally useful, it may not fit every store’s design aesthetic or business model. Removing unnecessary elements, like the WooCommerce cart icon, can significantly improve your website’s design and user experience.
This comprehensive guide will equip you with various methods, from simple theme settings to custom code, to effectively hide the WooCommerce cart icon. This will help you achieve a cleaner design and a more tailored user experience for your online store.
Understanding the WooCommerce Cart Icon’s Role and When to Hide It
Before you hide the WooCommerce cart icon, it helps to understand what it is and how it integrates with your WordPress site.
Defining the WooCommerce Cart Icon and Its Standard Placement
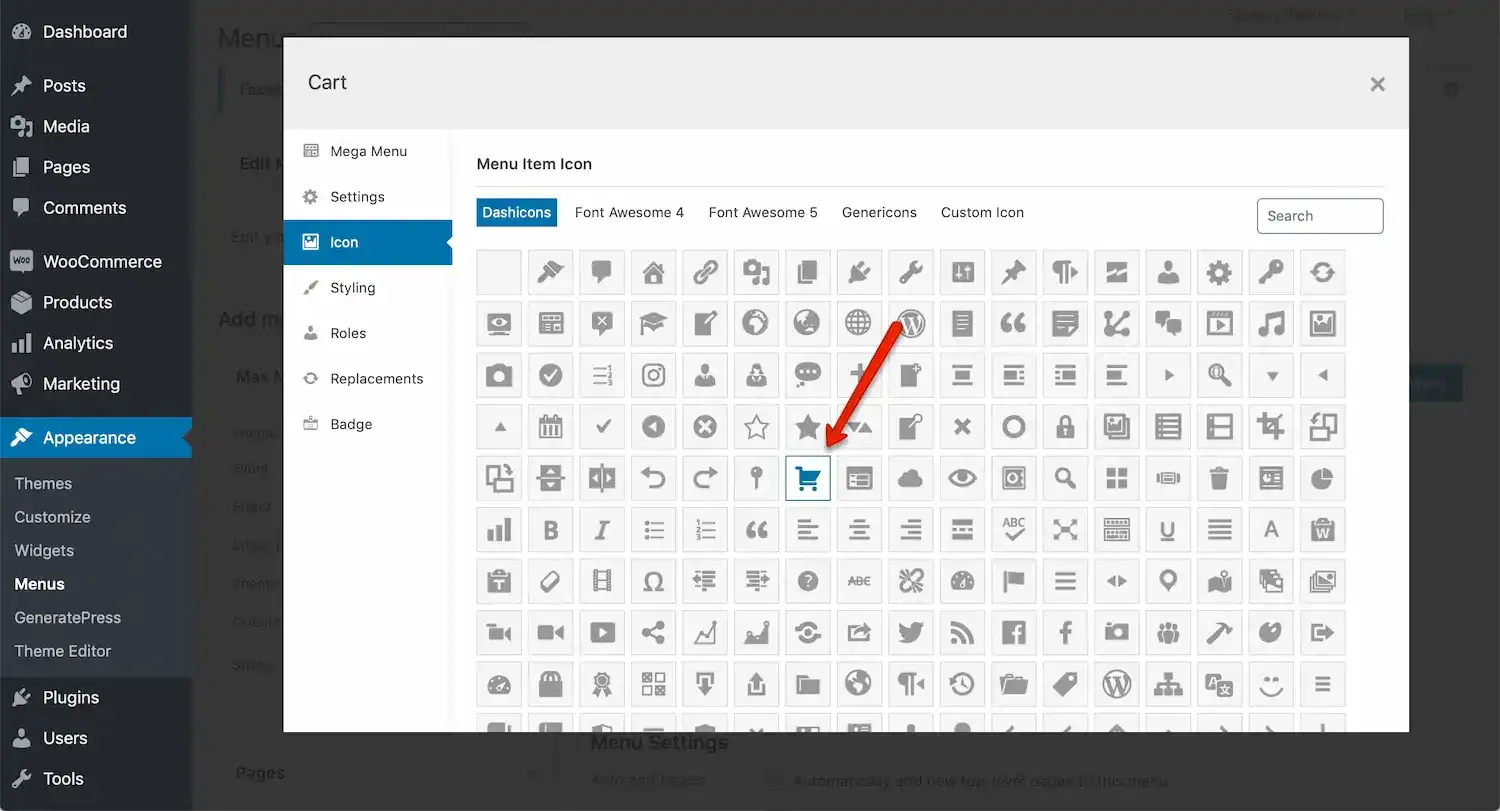
The WooCommerce cart icon, or the shopping cart icon, is a small graphical representation of a shopping cart or bag. It typically appears in the header or main navigation menu of a WooCommerce store. Its default function is to provide quick access to the shopping cart page or display a mini-cart dropdown, showing items added to the cart.
This icon’s appearance and exact location can vary significantly based on your active WordPress theme. Some themes place it prominently in the header, while others might integrate it subtly into the main navigation menu.
Need Help Customizing Your WooCommerce Store?
Let WPServices handle cart icon tweaks and other theme modifications with expert precision.
How the WooCommerce Cart Icon is Integrated
The WooCommerce cart icon is integrated into your website through various methods. Most commonly, themes include built-in support for displaying it as part of their WooCommerce integration.
The WooCommerce plugin itself provides the core functionality for the cart. Additionally, developers can use custom code and specific WordPress hooks to place or modify the icon’s display. This means there are multiple points of control for managing its visibility.
Distinguishing the Cart Icon from the “Add to Cart” Button
It’s important to clarify the difference between the WooCommerce cart icon and the “Add to Cart” button. The cart icon, typically in your navigation, provides a persistent link to the shopping cart or indicates items already added.
The “Add to Cart” button, on the other hand, is found on individual product pages or shop archives. Its purpose is to allow customers to add items directly to their cart. This tutorial focuses specifically on hiding the navigational WooCommerce cart icon.
Common Scenarios for Hiding the WooCommerce Cart Icon
Why would you want to hide this seemingly essential element? Several use cases make removing the WooCommerce cart icon beneficial:
- Catalog Mode: If your online store functions primarily as a product showcase or portfolio, where customers can browse but not directly purchase, removing the cart icon creates a cleaner, non-transactional appearance. This is common for B2B wholesale sites or service-based businesses.
- Specific Product Types: You might sell only digital products, services, or items with unique, non-traditional checkout flows. A conventional shopping cart icon can be confusing or unnecessary in such cases.
- Minimalist Design & Aesthetics: Every element must earn its place in a super clean or minimalist website design. Removing the WooCommerce cart icon can enhance your website’s design by making it sleeker and less cluttered.
- Custom Checkout Flows: The default icon becomes redundant if you have implemented a highly customized or external checkout process that bypasses the standard WooCommerce cart page.
- Conditional Display Needs: You might want to show the icon only when the cart is not empty, or perhaps only for specific user roles.
- Brand Consistency: Your brand image might dictate a more subtle or entirely different approach to user navigation, making the default icon a visual mismatch.
Also Learn: How to Update Your PHP Version for WooCommerce
Diverse Methods to Manage Your WooCommerce Cart Icon
You have multiple options to control the visibility of your WooCommerce cart icon. These methods range from simple settings for beginners to advanced code for developers. Choose the approach that best fits your comfort level and specific needs.

Method 1: Utilizing Theme Options or the WordPress Customizer for the Cart Icon
The easiest and safest way to hide the WooCommerce cart icon for most users is through your theme’s built-in options or the WordPress Customizer. This method requires no coding knowledge.
Navigating the WordPress Customizer for the WooCommerce Cart Icon
Many modern WordPress themes offer direct settings to control the display of various elements, including the WooCommerce cart icon.
- Navigate to Appearance → Customize: From your WordPress dashboard, hover over “Appearance” and click on “Customize.” This opens the WordPress Customizer, which allows you to make live changes to your website.
- Explore Theme-Specific Options: Once in the Customizer, look for sections related to your “Header,” “WooCommerce,” “Menu,” “Navigation,” or “Builder” settings. For instance, if you use the popular Storefront theme, you would navigate to Appearance → Customize → WooCommerce → General. Here, you might find an option like “Menu Cart” to untick to disable the icon simply.
- Visual Confirmation: The beauty of the Customizer is that changes appear in real-time in the preview window. You will immediately see if the WooCommerce cart icon has disappeared.
- Publish Changes: If satisfied, click the “Publish” button at the top to save your changes and make them live on your website.
Read More: How to Fix 405 Method Not Allowed Error in WordPress
Exploring Theme-Specific Options Panels for the Shopping Cart Icon
Some themes, especially premium ones like Avada or those from developers like Qode Interactive, have their own dedicated “Theme Options” panel. This panel might be located under “Appearance” or a separate menu item in your WordPress admin dashboard.
- Locate Theme Options: Look for the “Theme Options” or “Theme Settings” link in your WordPress admin menu.
- Search for WooCommerce Settings: Within the theme options, look for sections related to WooCommerce, header settings, navigation, or general layout. You might find a checkbox or toggle switch to enable or disable the shopping cart icon in your header or menu.
- Save Changes: After adjusting the setting, click the “Save Changes” or “Update Options” button within that theme panel.
Pros and Cons of Built-in Theme Settings for the WooCommerce Cart Icon
Pros:
- Most manageable for beginners: Requires no coding.
- Safe: Less chance of breaking your site.
- Update-proof: Changes are stored within theme settings and are safe from theme updates.
Cons:
- Limited control: Often an all-or-nothing option; you can’t usually set conditional rules (e.g., hide only when empty).
- Not universally available: Many themes, especially older or simpler ones, might not offer this specific setting for the cart icon.
- Theme-dependent: You are reliant on your theme developer’s choices.
This method works best for beginners and those using themes with robust customization capabilities who need a simple on/off switch for the WooCommerce cart icon.
Read More: How to Use Elementor WooCommerce Builder
Method 2: Hiding the WooCommerce Cart Icon with Custom CSS
If your theme doesn’t offer a built-in option or needs more granular control, custom CSS is your next powerful tool for hiding the WooCommerce cart icon.

The Precision of Custom CSS for Cart Icon Display
Custom CSS (Cascading Style Sheets) lets you directly target specific HTML elements on your web page and control their appearance. By applying display: none to the correct element, you can effectively hide it from view. This method is often preferred because it’s lightweight, non-destructive, and works across almost all WordPress themes.
How to Find the Correct CSS Selector for the WooCommerce Cart Icon
The trick to using custom CSS is finding the exact CSS selector for the WooCommerce cart icon in your theme.
Use Browser Developer Tools (Inspect Element): This is your best friend for finding CSS selectors.
- Right-click on your website’s live page where the shopping cart icon appears.
- Select “Inspect” (Chrome, Firefox, Edge) or “Inspect Element” (Safari) from the context menu. This opens the browser’s developer tools.
- Hover over the icon: In the Elements tab (or Inspector), the corresponding HTML code will be highlighted as you move your mouse over different parts of your website. Hover over the WooCommerce cart icon until you find its specific HTML element.
- Identify the Class or ID: Look for unique identifiers attached to that element, such as id=”some-unique-id” or class=”some-class-name”. These are your CSS selectors. Common examples for the menu cart icon might be <li id=”menu-item-cart”>, <div class=”woocommerce-cart-icon”>, or <a class=”cart-contents”>.
Note the Selector: Write down the most specific class or ID you find.
Explore Further: How to Fix 404 Not Found Error in WordPress
Adding Custom CSS Code to Hide the WooCommerce Cart Icon
Once you have the selector, you can add your custom CSS code.
Method A: WordPress Customizer → Additional CSS (Recommended for most):
- Navigate to Appearance → Customize.
- Click on “Additional CSS” at the bottom of the left sidebar.
- Paste your CSS code here. This method is safe because the code is stored in the database and won’t be lost during theme updates.
- Click “Publish.”
Method B: Child Theme style.css file (Best for Developers):
- If you have a child theme set up (which is a best practice for any theme modifications), open your child theme’s style.css file.
- Add your custom CSS at the end of this file. This ensures your changes are isolated from the parent theme and remain intact after theme updates.
Method C: Plugin for Custom CSS:
- Install a plugin like “Simple Custom CSS” or “WPCode” (which includes a custom CSS feature).
- These plugins provide a dedicated area in your WordPress dashboard to add custom CSS, keeping your code organized and safe.
Example CSS Snippets for the WooCommerce Cart Icon
Here are common CSS snippets. Remember to replace the placeholder selectors with the ones you found using your browser’s developer tools.
Basic Hiding:.
.woocommerce-cart-icon {
    display: none;
}
Using !important for Stubborn Themes: Sometimes, a theme’s default CSS might be more “specific” than your custom CSS, preventing your rule from applying. In such cases, you can use !important, but use it sparingly as it can make future CSS debugging harder.
.cart-contents {
    display: none !important;
}
Hiding the Parent List Item (Common for menu items): If the icon is part of a list item in your navigation, you might need to hide the entire <li> element.
.main-navigation .menu-item-type-woocommerce.menu-item-has-children {
    display: none;
}
Applying Responsive Rules (Hide on Mobile or Tablet Only): Use media queries to hide the icon only on specific devices. For example, to hide on screens smaller than 768px (typical for tablets/mobiles)
@media screen and (max-width: 768px) {
    .woocommerce-cart-icon {
        display: none;
    }
}
Or to hide only on desktop:
@media screen and (min-width: 769px) {
    .woocommerce-cart-icon {
        display: none;
    }
}
Troubleshooting Custom CSS
- CSS Specificity: If your icon is still visible, your CSS rule might not be specific enough. Try using a more precise selector (e.g., combining parent and child elements) or, as a last resort, !important.
- Caching: Always clear your website’s cache and your browser’s cache (hard refresh: Ctrl + F5 or Cmd + Shift + R) after adding any CSS.
Syntax Errors: Double-check your CSS code for typos or missing semicolons/curly braces.
Method 3: Removing the WooCommerce Cart Icon via PHP Snippets
For advanced control, conditional display, or when CSS is simply insufficient, using PHP code snippets offers the most powerful solution for managing the WooCommerce cart icon.

Why Use PHP Snippets for the WooCommerce Cart Icon?
PHP snippets allow you to interact directly with WordPress and WooCommerce hooks and filters. This means you can dynamically decide whether to display the icon based on various conditions (e.g., if the cart is empty, if a user is logged in, or on specific pages). This offers a level of control that CSS alone cannot provide.
Safety First: Child Theme or Code Snippets Plugin
Critical Warning: Directly editing your parent theme’s functions.php file is dangerous. A syntax error can break your entire site, and changes will be lost when the theme updates.
Recommendation: Use a child theme’s functions.php file for your custom PHP code. Alternatively, a “Code Snippets” plugin (like the popular “Code Snippets” plugin by WPCode) is an excellent and safe way to manage custom PHP snippets without touching theme files. This plugin allows you to easily add, activate, and deactivate code snippets from your WordPress dashboard.
Explore Further: Unlimited Support vs Hourly WooCommerce Help: Which is Right for You
Example PHP Snippet: Removing a Standard Header Cart Action
Many themes integrate the WooCommerce cart icon into the header using specific WordPress or WooCommerce action hooks. You can use remove_action() to “unhook” this functionality.
Let’s take the popular Storefront theme as an example. It uses a function called storefront_header_cart hooked to storefront_header. To remove it:
add_action( 'init', function() {
    remove_action( 'storefront_header', 'storefront_header_cart', 60 );
});
Explanation:
- add_action( ‘init’, function() { … }); ensures this code runs early in the WordPress loading process.
- remove_action() is the function that unhooks an action.
- ‘storefront_header’ is the hook name where the cart was added.
- ‘storefront_header_cart’ is the name of the function that adds the cart.
- 60 is the priority number; it must match the priority used when the original action was added.
Note: Your theme’s exact hook name, function name, and priority will vary. You might need a developer’s expertise or tools like “Query Monitor” to find the specific hook your theme uses.
Conditional Removal of the WooCommerce Cart Icon
PHP allows powerful conditional display logic.
Hide When Cart is Empty: You can modify the cart icon display logic so it only appears if items are in the cart. This requires a slightly more complex snippet that hooks into woocommerce_add_to_cart_fragments to update the cart link. A simplified example of the concept (full implementation often involves re-registering the cart fragment):
// Basic concept: hide if cart count is 0
function my_hide_cart_icon_if_empty() {
    if ( WC()->cart->is_empty() ) {
        // Apply CSS class or other method to hide.
        // This is simplified, often requires filtering the actual cart output HTML.
        echo '<style>.your-cart-icon-selector { display: none !important; }</style>';
    }
}
add_action( 'wp_footer', 'my_hide_cart_icon_if_empty' ); // Or a more specific hook
This is a simplified example to illustrate the concept. For a robust dynamic icon that updates with AJAX, you’d typically work with woocommerce_add_to_cart_fragments and adjust the theme’s HTML structure.
Hide for Logged-Out Users/Specific User Roles:
add_action( 'wp_footer', 'hide_cart_icon_for_guests' );
function hide_cart_icon_for_guests() {
    if ( ! is_user_logged_in() ) {
        // This CSS selector needs to be identified via browser tools
        echo '<style>.your-cart-icon-selector { display: none !important; }</style>';
    }
}

// Example: Hide for 'customer' role
add_action( 'wp_footer', 'hide_cart_icon_for_customers' );
function hide_cart_icon_for_customers() {
    if ( current_user_can( 'customer' ) ) {
        echo '<style>.your-cart-icon-selector { display: none !important; }</style>';
    }
}
Hide on Specific Pages (e.g., Cart/Checkout Pages):
add_action( 'wp_head', 'hide_cart_icon_on_specific_pages' );
function hide_cart_icon_on_specific_pages() {
    if ( is_cart() || is_checkout() || is_page( 'my-custom-page' ) ) {
        echo '<style>.your-cart-icon-selector { display: none !important; }</style>';
    }
}
WordPress conditional tags like is_cart(), is_checkout(), is_product() (for single product pages), or is_page(‘page-slug-or-id’) are powerful for this.
How to Target Other Hooks or Filters
To find the correct PHP hooks or filters your theme uses for the WooCommerce cart icon, you might need to:
- Inspect Theme Files: If you are comfortable, look into your theme’s header.php or functions.php file for add_action or add_filter calls related to “cart,” “menu,” or “header.”
- Use Query Monitor: This free WordPress plugin is invaluable for developers. It shows all the hooks fired on a page, helping you identify which function is responsible for outputting the cart icon.
Discover More: WooCommerce Mastery: Site Settings in Elementor
Method 4: Leveraging Plugins for WooCommerce Cart Icon Management
For those who prefer a graphical interface over code or need specific advanced features, several plugins can help you manage the visibility of the WooCommerce cart icon.
Why Use a Plugin to Hide the Cart Icon?
Using a plugin is the simplest and safest way to hide the WooCommerce cart icon without touching code.
- Ease of Use: Plugins abstract away the code, providing user-friendly settings in your WordPress dashboard. This is ideal for non-developers.
- Advanced Control: Many plugins offer more granular control than basic theme settings, such as conditional display options (hide when empty, show/hide for specific user roles or device types).
- Conditional Logic: Some plugins provide intuitive interfaces for setting up complex display rules without writing a single line of code.
Overview of Popular Plugins for Cart Icon Control
If you prefer not to edit code manually, several WordPress plugins make it easy to hide or customize the WooCommerce cart icon. These tools offer user-friendly interfaces and flexible settings for beginners and advanced users.
- WooCommerce Menu Cart: This dedicated plugin is designed specifically to manage the menu cart icon’s appearance and visibility. It often provides options to hide the icon when the cart is empty, change its display (icon only, icon with price, icon with items), and select its position.
- Code Snippets plugin (by WPCode): While not for directly hiding the icon, this plugin is essential if you decide to use PHP code snippets (as discussed in Method 3). It provides a safe environment to add, activate, and deactivate custom PHP code without touching your theme’s functions.php file, preventing site breakage.
- Theme-Specific Addon Plugins: Many premium themes (like Astra Pro or OceanWP Pro) offer companion plugins or premium add-ons that extend their customization capabilities. These often include advanced settings for header elements, where you can find options to control the WooCommerce cart icon.
- Header Builder Plugins: Page builders like Elementor Pro or Beaver Builder often include theme builder functionalities that allow you to create custom headers from scratch. This gives you complete drag-and-drop control over what elements, including the WooCommerce cart icon, appear in your header. You can simply choose not to add the cart widget if you want to hide it.
Explore Further: Dashboard Widgets in WooCommerce
Step-by-Step: Install, Activate, and Configure Plugin Settings
Using a plugin is one of the easiest and safest ways to hide the WooCommerce cart icon without touching any code. Follow these steps to install and set up the right plugin.
- Install: Go to Plugins → Add New in your WordPress dashboard.
- Search: Use the search bar to find the desired plugin (e.g., “WooCommerce Menu Cart” or “Code Snippets”).
- Install & Activate: Click “Install Now” and then “Activate.”
- Configure: Navigate to the plugin’s settings (usually found under WooCommerce → Settings, Appearance, or a new top-level menu item). Look for options related to “Cart Icon,” “Menu Cart,” or “Header Elements” and adjust them to hide or manage the icon’s display. Remember to save any changes.
Advantages and Limitations of Plugin-Based Approaches
Using plugins to hide the WooCommerce cart icon offers a quick and accessible solution, especially for non-technical users. However, it comes with trade-offs in terms of flexibility and long-term maintenance.
Advantages:
- Simplicity: No code knowledge is required, and it is very user-friendly.
- Robust Features: Often provides more options for conditional display than basic theme settings.
- Safety: Most plugins are well-tested and won’t break your site with simple configuration.
Limitations:
- Adds another plugin: Every plugin adds code to your site, which can sometimes impact performance (though well-coded ones have minimal impact).
- May not offer every customization: If you have a niche requirement, you might still need custom code.
- Reliance on plugin updates: You’ll depend on the developer for compatibility and security updates.
This method is ideal for users who prefer a GUI-based solution, need more advanced conditional display options without coding, or are uncomfortable directly modifying theme files.
Advanced Customization Options for the Shopping Cart Experience
Hiding the WooCommerce cart icon can be part of a broader strategy to refine your shopping experience.
Disabling “Add to Cart” Functionality Per Product
Sometimes, you might want to hide the cart icon because certain products aren’t directly purchasable. You can control the “Add to Cart” button per product using a PHP filter or WooCommerce’s built-in product options.
- Use Case: This is useful for informational products, items permanently out of stock, or services requiring a custom quote process.
- Method (PHP Filter): Developers can use the woocommerce_is_purchasable filter to disable purchase functionality for specific products or product categories programmatically.
- WooCommerce Product Data Settings: For simpler cases, edit a product, go to the “Product data” section, and adjust settings like “Virtual,” “Downloadable,” or remove the price to make it non-purchasable. You can also change the product type to “External/Affiliate product” if you’re linking to an external site.
Building a Completely Custom Header Template
Consider building a custom header template for your WordPress site for ultimate design freedom.
- Tools: Popular page builders like Elementor Pro, Beaver Builder, or themes that support Full Site Editing (FSE) with the Gutenberg Block Editor allow you to design your header from scratch.
- How it helps: When you design a custom header, you have complete drag-and-drop control over every element. You can choose to include a WooCommerce cart widget (or not), place it precisely where you want, and style it to perfection. If you’re going to hide the WooCommerce cart icon entirely, you simply omit adding a cart element to your custom header.
- Benefits: This offers unparalleled design freedom and ensures your header perfectly integrates with your specific visual identity.
Dynamic Display: Hiding the WooCommerce Cart Icon Based on User State
Beyond simple on/off switches, advanced techniques allow the WooCommerce cart icon to be displayed dynamically based on user behavior or status.
- Hide when the cart is empty: This is a popular UX choice. The icon only appears when it’s relevant, when a customer has added items. This reduces visual clutter for browsers.
- Hide when the user is not logged in: Ideal for B2B stores or membership sites where shopping functionality is exclusive to logged-in members.
- Hide for specific user roles: If you have different types of customers or internal staff, you can tailor the display based on their roles.
These dynamic rules typically require PHP snippets or advanced plugin settings, offering a sophisticated way to manage the shopping cart icon for a more tailored user experience.
Also Learn: Setting up Shipping in WooCommerce
Testing and Troubleshooting Your WooCommerce Cart Icon Changes
After implementing these methods to hide the WooCommerce cart icon, thorough testing is crucial to ensure your changes are visible and haven’t introduced any unintended side effects.
Clear Caches Immediately: The Golden Rule
This cannot be stressed enough: Always clear your caches! Due to caching layers, your changes might not appear immediately.
- Website Caching: If you use caching plugins (e.g., WP Rocket, LiteSpeed Cache, W3 Total Cache, WP Super Cache), navigate to their settings in your WordPress dashboard and clear all cached data.
- Browser Cache: Your web browser often stores old versions of web pages. Perform a hard refresh (Ctrl + F5 on Windows/Linux, Cmd + Shift + R on Mac) or manually clear your browser’s cache and cookies.
- CDN Cache: If you utilize a Content Delivery Network (like Cloudflare or Sucuri), log into your CDN provider’s dashboard and purge its cache.
Verifying Changes Across All Environments
After you hide the WooCommerce cart icon, it is important to ensure the change appears correctly everywhere. A design that works in one setup might behave differently elsewhere due to caching, browser quirks, or device-specific rendering.
- Test Across Devices: The WooCommerce cart icon might hide correctly on desktop but reappear on mobile devices. Always check your website on all sizes of smartphones, tablets, and screens.
- Test Across Web Browsers: Confirm the icon is hidden consistently across popular web browsers like Chrome, Firefox, Safari, and Edge.
- Incognito/Private Mode: Use your browser’s incognito or private browsing mode. This bypasses your browser’s cache and can give you a “fresh” view of your site.
Using Browser Developer Tools for Verification
If the icon is still visible, revisit your browser’s developer tools (right-click, then “Inspect”).
- Inspect Element (Revisited): Hover over where the icon should be. Confirm that the display: none; the rule you added (or a similar rule from a plugin/theme) is applied to the correct element. Look for any conflicting CSS rules that might be overriding yours.
- Console Tab: Check the “Console” tab for any JavaScript errors. Sometimes, a JavaScript error might prevent CSS from loading correctly or interfere with dynamic elements.
Common Pitfalls and How to Resolve Them
Even simple changes can lead to unexpected results if not handled carefully. Here are some typical issues users face when trying to hide the WooCommerce cart icon and how to fix them effectively.
- Icon Still Visible: The most common causes are caching issues, an incorrect CSS selector (specificity problem), or an overriding setting from your theme or another plugin. Systematically troubleshoot each possibility.
- Site Breaks After PHP Snippet: This indicates a syntax error in your PHP code. Immediately revert to your last working backup or remove the problematic snippet using your hosting’s file manager or the “Code Snippets” plugin’s safety features. Use a syntax checker before uploading new code.
- Mini-Cart Still Appears on Hover: If you successfully hid the WooCommerce cart icon but hovering over its previous location still reveals a mini-cart dropdown, you’ve likely only hidden the icon, not the associated mini-cart module. You’ll need to target the mini-cart’s CSS selector (e.g., .widget_shopping_cart_content) with display: none.
- Lack of User Accessibility: If you remove the WooCommerce cart icon, ensure there’s still a straightforward, intuitive path for users to find their cart or proceed to checkout, especially for active e-commerce stores. You might need a text link in your menu or a dedicated cart page link in the footer.
Conclusion on Design Improvement: A Cleaner Look for a Better User Experience
Successfully hiding the WooCommerce cart icon is more than just a cosmetic change; it’s a strategic move towards a better website design, an enhanced user experience, and a more tailored online store appearance. A simplified interface reduces visual clutter, allowing customers to focus on your products and streamline their journey toward conversion.
We’ve explored multiple reliable methods to hide the WooCommerce cart icon: from the straightforward approach of using built-in theme options or the WordPress Customizer, to the precise control offered by custom CSS, the dynamic capabilities of PHP snippets, and the user-friendly solutions provided by plugins. Each method offers flexibility to meet diverse store needs and technical comfort levels.
Empower yourself as an online store owner to take control of your website’s appearance. By making it more user-friendly and visually appealing, you directly contribute to achieving your business goals. Remember to test any significant changes on a staging site before implementing them on your live production site. Apply these steps, verify your changes, and continue to explore other design improvements to enhance your online store’s functionality and user experience. Your streamlined, optimized store awaits!

